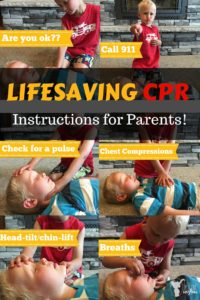
This is a detailed post on how to administer CPR correctly. As CPR changes over the years it is important, as a parent, to stay up on the latest techniques. Thankfully I have an amazing brother that teaches this weekly!
As in my post for emergency care for drowning victims, the first steps are always the same when you come upon an emergency! This post will focus on more detail and technique of CPR. Take time and sit with your spouse and review this. Use the free printable below to print out and hang on your fridge where you can refer to it often! The more times you see something and read it, the greater chance of it sticking.
#1 SECURE THE SCENE
The first thing you need to do is always check your surroundings, and make sure no one else, including yourself, is in danger.
#2 ASSESS the situation

The following should take about 10 seconds or less.
- BEGIN BY CHECKING FOR A RESPONSE – If they are conscious they will respond to sound or pain. Speak to them, shake them, or pinch them. If they do not respond then..
- CHECK TO SEE IF THEY ARE BREATHING – If they do not respond and are not breathing, then continue to STEP #3.
#3 CALL 911
POINT at someone and make eye contact as you tell them to call 911. This places the responsibility on someone, and everyone isn’t thinking that someone else is calling 911. If there is someone else there, ask for them to get an AED. An AED is a defibrillator that shocks the heart. It is important to get one as soon as possible, if possible!

#4 CHECK FOR A PULSE
Place your two fingers on the side of their neck and check for a pulse. If no pulse is found, or it’s lower that 60 beats per minute(bpm) in kids and 40 bpm in adults, then continue to STEP #5.

*NOTE* If there is a pulse and they are not breathing, then administer rescue breaths. Rescue breathing is when the victim has a good strong heart beat but is not breathing. In this scenario we don’t need to do compressions, only breaths.
For Adults-Give mouth to mouth, 1 breath every 5-6 seconds for an adult
For children – Give mouth to mouth, 1 breath every 3-5 seconds for a child.
For Infants – Give mouth to mouth & nose by sealing your lips around both the infants nose and mouth. If this is inadequate, than try mouth to mouth (plug the nose), or mouth to nose (close the mouth). Give 1 breath every 3-5 seconds.*
If the individual is non responsive, is not breathing, and does not have a pulse, begin CPR.
#5 Begin CPR in the CAB sequence(Circulation, Airway, Breathing)
For a long time people were taught the ABC’s, which represented: AIRWAY, BREATHING, CIRCULATION. They have now found that circulation is “KING” (as my brother would call it). It is more important to circulate blood to the body than to provide rescue breaths initially. They now teach, CAB: CIRCULATION, AIRWAY, BREATHING!
Chest compressions- Place the heels of your hands on the center of the chest (make sure you are not too low on the sternum), and push fast and hard on adults pressing down 2-2.5 inches.

Children – Use one hand and press down 2 inches. You can use both hands if you are getting tired or your depth is not sufficient.
Infants – Press down 1 1/2 inches with 2 fingers
You will do 30 compressions at a 100-120 beats per minute to every 2 breaths (30:2). They say the tune to “Staying Alive” is a good indicator how fast you should go. (Watch the video link below) If there are 2 rescuers then you will do 15 compressions to 2 breaths (15:2) on children and infants.
Allow complete chest recoil after each compression to allow the heart to refill with blood.
Minimize interruptions of chest compressions.
Avoid excessive ventilation.
For best results, deliver chest compressions on a firm surface.”(1).
BREATHS
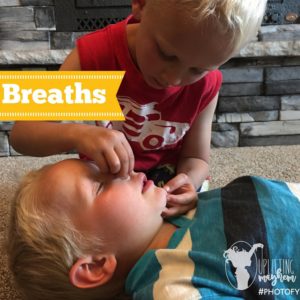
After you have given 30 compressions (or 15 if there are 2 rescuers) give 2 breaths. When you give breaths, open the airway by placing your hand on their forehead and with the other hand tilting the chin up.
Plug the victims nose, and make a seal over their mouth with your lips.

Make sure the breaths are effective and the chest rises with each breath. If chest is not rising, re-position and open airway.
Repeat compressions and breaths until help arrives or you begin to feel a pulse. If there is someone else with you, it is very important to trade off doing compressions. It is tiring, and can result in poor compression depth.
*Note* If there is blood or vomit present, OR you do not feel comfortable giving mouth to mouth, still continue to administer compressions! Keeping the circulation going can be lifesaving!
Click here for a good face mask for CPR. It’s a good idea to carry one in your car, and first aid kits.
This one is a key chain version
Here is a free printable that you can print out for your personal use. I am a strong believer of repetition. This printable you can hang on your fridge to refer to over and over again!
HERE IS A LINK TO A GREAT VIDEO PUT OUT BY cpr.heart.org
You can also go to heart.org for more information and videos.
